
Irrigation valves may not be the flashiest part of your landscape, but they’re definitely one of the most important. They control water flow, regulate pressure, and ensure each zone of your sprinkler system gets precisely what it needs. Yet many homeowners underestimate how detailed irrigation valve installation really is. Before you start digging or connecting wires, it’s crucial to understand the setup, parts involved, and the common pitfalls that can lead to leaks, uneven watering, or complete system failure.
Whether you’re installing a new sprinkler system, upgrading an older one, or replacing an irrigation valve, knowing the basics can save you time, money, and future repairs. This guide breaks down everything you should expect—delivered in an easy-to-read, conversational tone, yet grounded in professional-level detail. And if you decide you’d rather leave it to the experts, companies like Transiciones Inc. offer reliable irrigation system installation in New York, taking the stress off your shoulders.
Let’s walk through the essential things to know before installing irrigation valves so your system works efficiently from day one.
Understanding the Role of Irrigation Valves
Before anything else, it helps to know what irrigation valves actually do. These valves act as gates that open and close to allow water to flow to different zones of your sprinkler system. They’re the heart of the operation, responding to your irrigation valve controller connection and delivering water exactly when scheduled.
There are several irrigation valve types—electric valves, manual valves, anti-siphon valves, and jar-top valves. Each has different applications, so selecting the right type for your landscape matters. For example, electric valves are popular for their convenience and compatibility with automated controllers.
Understanding your system layout helps ensure sprinkler valve installation goes smoothly and avoids future complications. For more guidance on system mistakes, you can check out Transiciones Inc.’s helpful article: Top Irrigation Design Mistakes Homeowners Should Avoid.
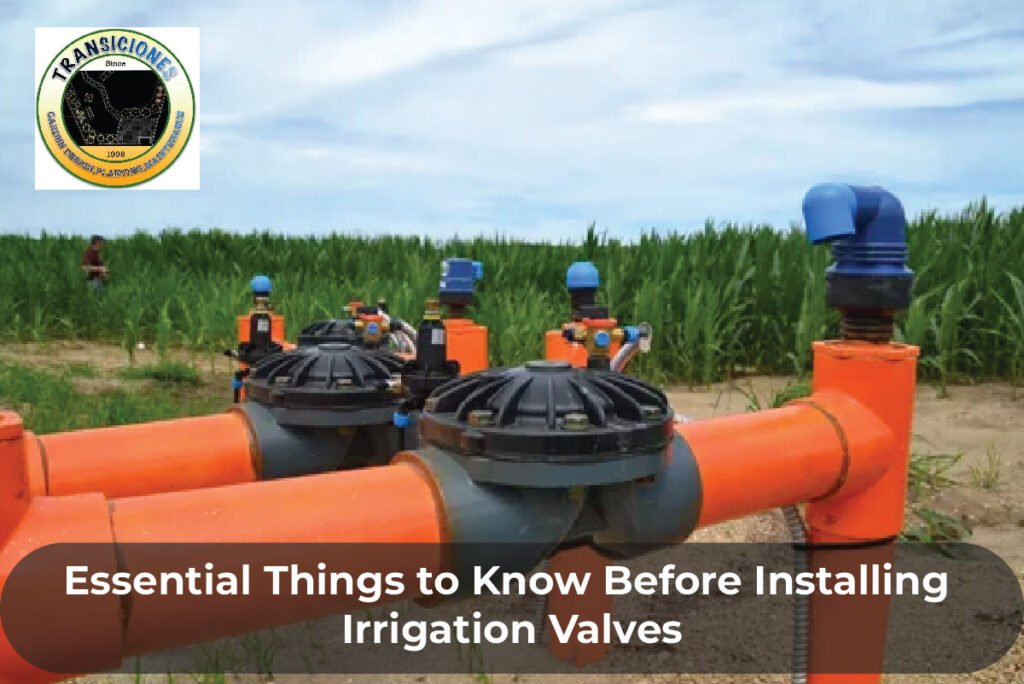
Choosing the Right Irrigation Valve Type
Picking the wrong valve type can lead to endless frustration, so you’ll want to select your valve based on your region, water pressure, and system design. Electric valves are most commonly used for residential irrigation valve installations because they connect directly to a controller.
Anti-siphon valves, on the other hand, prevent contaminated water from flowing back into your drinking supply—a key requirement in many areas. If you live in a region with strict irrigation plumbing codes, make sure you research local regulations before beginning the installation.
You’ll also need to consider valve size. Most homes use 1-inch valves, but higher-pressure systems or commercial properties may require 1.5- or 2-inch assemblies. When in doubt, a professional installer can help you choose the correct irrigation valve assembly for optimal flow.
Preparing Your Irrigation Valve Box Area
Proper installation of the irrigation valve box is essential because it keeps your system organized, protected, and accessible. The valve box is where all the magic happens—it houses your valves, wiring, and pipe connections.
Before installation, make sure you choose a stable, level spot with good drainage. Poor placement often leads to standing water inside the box, which may cause corrosion or valve failure. Many professionals add gravel underneath the box to improve drainage and stability.
Another important tip: ensure the valve box is large enough for your irrigation valve wiring. Too many homeowners end up with a cramped box, making repairs later much more complicated than they need to be.
The Importance of Proper Irrigation Valve Wiring
Irrigation valve wiring is often the most intimidating part for DIY installers, but the good news is that it’s easier than most people think. Each valve requires two wires: one standard wire (shared by all valves) and one control wire connected to the irrigation valve controller. These wires must be waterproofed and buried at the proper depth to avoid damage.
Using waterproof wire connectors is non-negotiable—they protect your system from moisture-related shorts. Many professionals also recommend color-coding your wires so it’s easier to identify which line controls which zone.
If you’re adding new valves to an existing system, label each wire clearly to avoid confusion later. This simple step prevents wiring errors that may cause valves to open at the wrong time or fail to open.
Installing the Irrigation Valve Assembly
The valve assembly is where everything comes together: valves, pipe fittings, unions, filters, and, when needed, pressure regulators. A typical sprinkler valve installation includes:
- Cutting and cleaning PVC pipes
- Priming and gluing connections
- Placing valves in the correct flow direction
- Installing unions for more straightforward future repairs
- Leak testing before burying
If you’re upgrading valves during irrigation valve replacement, double-check pipe compatibility. Older systems may use outdated pipe types or fittings, which require adapters.
Another bright tip: install shut-off valves before the main valve assembly. This makes maintenance easier and prevents water from flowing during repairs.
Testing the System Before Backfilling
Once your irrigation valve installation is complete, resist the urge to bury everything immediately. Testing ensures your valve assembly works correctly and prevents hidden leaks underground.
Turn on the irrigation valve controller connection and check:
- Does each valve open and close when scheduled?
- Is water pressure stable across all zones?
- Are there visible leaks at any joints?
- Does wiring respond appropriately to commands?
This step is crucial. Fixing a leak above ground is easy; correcting one buried under soil and sod is time-consuming and expensive.
Professionals test each valve multiple times to confirm accuracy and timing. Once everything is running smoothly, you can backfill the valve box and tidy up the surrounding landscaping.
Common Mistakes to Avoid During Installation
Many homeowners run into preventable problems because they underestimate how sensitive irrigation systems can be. Some common mistakes include:
- Over-tightening fittings, leading to cracks
- Installing valves in the wrong direction
- Using non-waterproof connectors for wiring
- Placing the valve box too close to the walkways
- Ignoring pressure regulation needs
- Forgetting to flush pipes before installation
Avoiding these mistakes keeps your irrigation valve repair needs to a minimum and ensures your system lasts longer without performance issues.
If you’re entirely new to irrigation systems, professionals like those at Transiciones Inc. can handle everything from installation to troubleshooting.
Why Hiring a Professional Is Often Worth It
DIY installation is possible, but hiring an expert often saves time and reduces long-term maintenance. Professionals understand advanced factors like pressure zones, elevation changes, and optimal irrigation valve wiring layouts that beginners may overlook.
They also install valves quickly and safely using durable materials and proven techniques. With expert help, you get a system that runs efficiently, wastes less water, and requires fewer repairs over the years.
Plus, reputable companies offer ongoing support if you ever need irrigation valve repair or system upgrades.
Explore Transiciones Inc.‘s services for a stress-free installation backed by experience.
Final Thoughts
Installing irrigation valves correctly lays the foundation for a healthy, efficient sprinkler system—and knowing what to expect helps you avoid major mistakes. Whether you’re replacing old valves, adding new ones, or installing an entire system from scratch, careful planning ensures lasting performance.
Focus on selecting the correct valve type, wiring correctly, preparing the valve box area, and thoroughly inspecting and re-burying anything before testing. With the right approach—or professional help—your landscape will stay healthy, hydrated, and beautiful.
FAQs
1. How deep should irrigation valves be buried?
Most valves are placed 6–12 inches deep inside an irrigation valve box for protection and accessibility.
2. Can I mix different irrigation valve types in one system?
Yes, as long as they match your water pressure needs and are compatible with your controller.
3. How long do sprinkler valves typically last?
With proper installation and maintenance, most valves last 8–15 years.
4. Why isn’t my valve opening when the controller turns on?
Common causes include wiring issues, debris inside the valve, or a faulty solenoid.
5. Do I need a professional for irrigation valve replacement?
Not always, but professionals ensure pressure settings, wiring, and connections are done correctly.